Fujifilm X70

UPDATE MAY 2016 After two months I decided to sell the camera, it is too flimsy and too slow and in my humble view there are much better point and shoot for that amount of money. I got a Leica Q much more expensive but a real super camera!

The new Fujifilm X70 camera has a spectacular design and a magnificent look as well with the retro aesthetics just like the some of the other Fujifilm X series cameras which make it unique and special.

The camera is easily portable and fits in a jacket/coat pocket and weighs only 340g with in-fitted memory card and NP-95 battery which makes it a perfect for an adventurous trip and street photographers since it's highly inconspicuous. The lens is 28mm f2.8 and a 16MP APS-C sensor that provides an exquisite and high-quality image. The diaphragm has nine rounded blades and a close-focusing limit of only 10cm.

I was not in need of a new camera and just wanted to try one for a review.


It is super small but I really mean small but at the same time it is very nice to hold it with a rubberized front and rear grips which are well-sculpted, and the camera feels comfortable in one hand.   At the beginning was not easy for me to use the LCD and was always looking for the viewfinder but I got used quite quickly and was fun the possibility to shot or focus touching directly on the LCD screen.

It has the same functionality of my XT-1 and XE-2 (with the new firmware ver. 4 ) and I tend to use my Fuji in AF-S and focusing is very fast and precise. It seemed to me very good for street photography and I did not miss any frame even with people and boats moving.

Fujifilm X70 has an admirable feature which is the 1.04 million tilting dot LCD touch panel that is 3.0 inch and which is also capable of rotating at 180-degree angle.

The touch panel has the following functionality which includes in preview mode:

  • Image enlargement capability: this is achieved by double-tapping on the touch screen which also centers on the active focus. 
  • Image moving capability: just like the phone, one can move the image by dragging it with the finger on the touch screen.
  • Image zooming capability: one can enlarge the image by widening it by the use of the two fingers just like in a touchscreen phone. 
  • Image scrolling: one can scroll the image upwards or downwards by swiping either way by the use of a finger. 

In shooting mode you will have access to:

  • Focus Area Selection: Move the focus area before taking the image: one can achieve this by tapping on the touch screen.
  • Touch Shot: Touch to focus and shoot on a specific point.

There is a small icon in the mid right side of the screen where you can switch between the two modes as well as turn the touch function off.

Adjustments in exposure compensation can easily been achieved by the dial.

Additionally, the lens control ring can also be used to adjust continuous shooting, film simulation, ISO speed, and white balance.

On the left hand side of the camera there is another function button. It sits quite well hidden. Very useful. I have decided to assign it to external ring control.

There is also a dedicated switch with an automatic mode, that I think may come handy to less photography savvy users. The camera also has a built-in Wi-Fi connectivity and an in-camera time-lapse.

The new 18.5mm f/2.8 lens in the X70 is a super performer. The quality of this pancake design lens is outstanding.
It’s an entirely new design by Fujifilm. It consists of 7 elements in 5 groups with 2 aspherical elements. It’s constructed in a  compact way,  and because there is no collapsing necessary when turning on/off the camera, this results in a much faster startup time when you switch your camera on.

The lens autofocus quickly thanks to the X70 hybrid autofocus system with both contrast detection and phase detect AF  which offers a 49-point Single Point AF mode and a Wide/Tracking mode that offers a 77-point autofocus area. Autofocus is fast, with reported autofocus acquisition said to be of as little as 0.06 seconds.

The X70 can start up in 0.5 seconds in High Performance mode, it is amazing and has a shutter lag time of just 0.05 seconds, can continuously shoot at up to 8 frames-per-second for around 12 frames and can use a completely silent electronic shutter with exposures at 1/32,000s.

Another feature that is is packed in the X70 is the digital crop feature or “digital tele converter” as Fujifilm calls it. When shooting jpeg mode you can chose to use either a 28mm, 35mm or 50mm crop mode.  The camera does some magic so you actually get a full 16mp file, obviously you can see some compression.

The  camera has additional accessories that include the LH-X70 Lens Hood, WCL-X70 wide conversion lens, VF-X21 optional viewfinder and BLC-X70 half leather case. The camera is available in two colors, silver or black. 

The X70 is in my view meant for people who needs a compact camera, and for street photographers who needs something  inconspicuous for getting candid moments of streetlife.
 

This post has not been sponsored and I did not get media samples or freebies. For more information, check out my full disclaimer policy.

Peak Design System

I’d almost given up on finding a good camera strap solution for the way that I work but luckily I found Peak Designs .  The problem for me is that I often don’t want to have a strap on the camera at all, sometime I just like to use a cuff or a clutch and why notalight strap.   Most strap solutions gravitate towards using big bulky padding of some sort and that makes them both expensive and cumbersome to carry around for the small number of times I find myself looking for a new one. .  I’ve got several straps in my gear closet but all of them gather dust.  They are just too big and overly complex with these slider mechanisms that people seem so fixated with.  I guess if you walk around 12 hours a day with a camera on your shoulder then it might seem more useful but for the way I work it’s just not necessary.  Thing is though,  there’s always some point where I wish I had a shoulder strap with me.  Up until this point though I hadn’t seen a solution that gave me what I wanted.

The Micro Anchor system is the key to making the Leash easy to use and versatile.  Each Anchor is rated to hold 100lbs so you can easily carry your camera kit or even a supertelephoto lens.  The Leash and the Cuff both come with 4 Anchors.  Once you slide them into clip on the Leash and give it a tug you’ll hear it click into place.  To detach the Leash you have to push down on the Anchor and slide it back out of the clip.  It’s a secure system that I loved and trusted straight away.


There’s also an anchor point on the adjustment buckle for the Leash.  This means that you can create a loop for tethering your camera to either yourself or a static object like a railing if you are shooting from a building.  If you are carrying a backpack you could also tether the camera to your bag to save it if you ever dropped it.  Speaking as someone who has often found myself peering over the tops of buildings, lookouts, bridges and cliffs, this is an awesome little feature that I’ll be using a lot.

http://peakdesign.com

This post has received discount on Media samples. For more information, check out my full disclaimer policy.
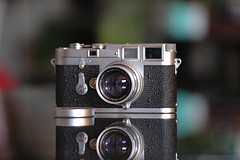
Leica M3 and M2

My Leica M3 Camera

The Leica M3 is perhaps the one camera that does not actually require an introduction. Voted by STUFF Magazine and Ebay as the “Top Gadget of All Time”

The epitome of vintage style, the Leica M3?s modern incarnations are still held as pinnacles of camera design and lusted by photographer all over the world.

Just the fact that since the Leica M3?s introduction 1954, the basic design of Leica M cameras has not really changed is a testament to how well conceived the Leica M3 is. In fact, one could argue that Leica built such a great camera that they haven’t really done much else since.

The Leica MP, introduced in 2003, nearly 50 years after the Leica M3, is just an inferior, and far more expensive, modern copy.The Leica M3 is Leica’s greatest achievement and also a stark reminder of it’s glorious past.

The Leica M3 was in production for 13 years. Do you know how many M cameras Leica has released in the last 13 years? Eight! That’s roughly one camera every 18 months. You have the Leica M7, MP, M8, M8.2, M9, M9P, M-E and the Leica M Type 240. Leica have become just like every other camera manufacturer in the digital world, pumping out a new camera every 18 months to two years. That’s not even counting their partnership with Panasonic!

In 1954 the Leica M3 inaugurated a completely new era of 35mm cameras. Though SLRs had started to appear earlier (e.g. the Exakta system from the late 1940s), the multiple-frameline rangefinder by Leica offered

the smoothest, fastest, most robust shooting experience available, coupled with the then-already optically superior Leitz lenses.

These cameras were constructed to the absolute highest standards of quality and maintainability (everything was designed to be adjustable over a long, long lifespan). As such, as long as the rangefinder optics are clean (the balsam glue of the beam splitter have a tendency to fail after about 40 years on some examples of the M3, fading or completely disabling the rangefinder) this is a very 'safe' camera to buy on eBay.

My copy (a late-model, single-stroke) truly looks and functions like a new camera, despite it's age of 52 years. It's quickest, smoothest, quietest camera I own. Rangefinders are, of course,much more limited than their SLR counterparts, and this could not be considered a "general purpose" camera anymore, but for anybody still practicing the art of developing and printing their own photographs in an analogue manner, the Leica M3 offers arguably the best body to obtain the ultimate image quality possible from the 35mm format.

Being the first "M", the collectivity (value) of the M3 is sure to increase with time, and finally, as an object considered in its own right (not as a tool) the M3 has timeless beauty and pureness of design.

Regarding lenses, nothing fits a Leica M3 better than a Summicron 50mm f/2 - it's small, chromed, and likely the highest-performance M-mount lens yet made (according to several tests). With this lens, you can imagine the M3 being a fixed-lens camera, it's so compact and well-matched. If the light is good, shoot some Ilford Pan F, and be prepared for prints of unmatched quality from the 35mm format.

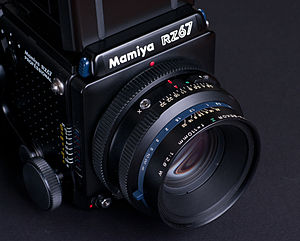
Mamiya RZ67 Pro II

English: Mamiya RZ67 Professional camera, lens...

The Mamiya RZ67 is my medium format single-lens reflex system camera manufactured by Mamiya. There are three successive models: the RZ67 Professional (first model

released in 1982), RZ67 Professional II (released in 1995) and RZ67 Professional IID (released in 2004). RZ67 is a modular camera system, meaning lenses, viewfinders, ground glasses, film winders and film backs are all interchangeable. It is primarily designed for studio use, but can also be used in the field. The RZ67 Sekor lenses have built-in electronic leaf shutters which are cocked and triggered from the body. Focusing is performed with a bellows on the body instead of the lenses.

The camera accepts 6x7, 6x6 and 6x4.5, 120 and 220 film magazines and Polaroid as well as Quadra 72 4x5 sheet film backs. Mamiya RB67 backs are also supported via the G-Adapter. The film speed is set on each RZ back via a dial. There are two versions of the 6x7 and 6x4.5 backs, the model II versions have a second film counter to always show the film count on the top. The RZ67 operates on one 6V silver oxide 4SR44 battery, or 6V 4LR44 alkaline battery. It can be used in emergency mode fully mechanically with a fixed 1/400 sec shutter speed. Multiple exposures are possible in the M-mode. Mirror flip up is supported. The body has one standard flash hot shoe on its left side, one plug for a standard remote shutter cable release, and a socket for an electronic shutter trigger. The RZ67 measures 104 mm (W) x 133.5 mm (H) x 211.5 mm (L) with the 110mm f/2.8 lens, and weighs approximately 2.4 kg (5.29 lbs). The flange distance is 105 mm.

The RZ67 name is adopted from the model name of the Mamiya RB67 (where RB stands for Revolving Back), which was first introduced in 1970, thus the RZ67 also takes backs which can be rotated 90 degrees to provide a horizontal or vertical composition. The orientation is shown in the viewfinder with black guides. The viewfinder also hosts LEDs informing of the state of the camera (flash ready, low battery, dark slide not removed, shutter not cocked). In addition to manual operation (photographer chooses aperture and shutter speed), the RZ67 is able to operate in AEF mode with an AE viewfinder (AE being an abbreviation for automatic exposure), which transmits exposure information directly to the body. In RBL compatibility mode, the RZ67 is able to use RB67 lenses. The biggest difference between RB67 and RZ67 is, that RB67 is completely mechanical. The RZ67 has also mechanical couplings between the parts, but the shutter is electronic, and parts are able to transmit exposure information with electronic couplings. In addition, the RZ67 has plastic exterior body, which makes it somewhat lighter.

Fuji X Custom Settings

Today arrived the new firmware for most of the Fuji X series cameras.  When you update all the custom settings are wiped out as well as cache memory and frame numberHere are more or less my latest  custom settings.

Name ISO Dynamic Range Film Simulation White Balance Colour Sharpness Highlight  Shadow  Noise 
Standard AUTO DR100 Provia (standard) Auto 0 0 0 0 0
Landscape Normal 200 DR100 Astia (soft) Auto -1 +1 -1 -2 0
Landscape  High Contrast 400 DR200 Astia (soft) Auto -1 +1 -1 -2 0
Portrait Neutral 200 DR100 Pro-Neg Standard Auto 0 0 0 0 0
Portrait Neutral Higher Contrast 400 DR200 Pro-Neg High Auto 0 +1 -1 -2 0
B&W Landscape 800 DR100 Mono+Red Auto 0 +1 0 0 0
B&W Portrait 800 DR100 Mono+Green Auto 0 +1 -1 -1 0


I have set them according to the subjects I tend to shot so I can change a whole group of settings with a push of the "Q" menu button and a quick turn of the dial.   Finer tweaks to color and highlight/shadow tone were done from experience of using the camera and the above are what I  eventually arrived at after some months of use.

I tend to play quite a bit with Highlight Tome, Sharpness and Shadow Tone so I change them often. For the ISO thee are times when I like to have in AUTO with Standard 200, Max 3200 and min shutter speed at Focal length I am using x1.8

While I like the more saturated colors and higher contrast in Astia (soft) for landscape generally, I found it tended to clip into the shadows too easily so I somewhat reduced the contrast there by making a -2 adjustment.

For portraits the Provia (standard) or Pro-Neg film simulations work well as they are rather neutral and subdued in colour, so render skin tones well.  The Pro-Neg Hi gives the same colours but more contrast.  I reduced the contrast at the shadow end as I found it was clipping to black too readily.

The dynamic range settings work really well and allow the camera to record more detail in highlights and shadows than in a normal exposure.  For the higher DR setting (DR200 is all I have needed) the camera needs to be set to ISO 400 but the sensor/processor is so effective that there is no discernible noise penalty.  It isn't an HDR feature....my understanding is that it works like many other similar features and the camera basically underexposes the image then processes in an exposure and tone curve that avoids clipping at each end.

The Jpeg output is so good on this camera that I shoot Jpeg almost all the time, whereas I only shoot RAW on my Nikon DSLRs.  Images from the X-E1 print superbly and have amazing pixel level sharpness.  The camera seems to resolve beyond what its 16MP sensor should, probably due to the absence of the anti aliasing filter.  Strangely, when 100% images are viewed on a computer monitor, detail can look somewhat mushy due to the unusual colour filter layout of the X-Trans sensor, but images view nicely at normal sizes and print in a very natural way, giving what I would describe as an organic look to textures that look real enough to touch and bitingly sharp.


Fuji X100s for street photography

I am often asked what settings I use for street photography. First, let’s make sure you have everything you will need, extra batteries and extra memory cards. A fast memory card is essential when shooting raw. ...do not forget your camera! (Marco Secchi)

Here are my settings for street shooting: Auto ISO: 200-3200 Min. Shutter speed limit: 1/125 Focus AF-C mode Drive Mode S or C: most of the time I am in s mode, c-mode if the situation really calls for it. While in AF-C mode , always awake/never sleep doesn’t work, keep half pressing the shutter from time to time, especially when you spot a potential shot, make sure the camera is not asleep Shutter priority at 1/250 or higher in regular light Optical Hybrid finder vs EVF: depending on the scene, if it is a context or overview shot, OHVF works, however, I found the EVF preferable for precise positioning of the af point since there is no time to reframe/refocus. Develop a solid grip on your camera, experiment, strap around the neck or wrist strap. Learn to change +- dial with out looking at your camera, the same goes for shutter speed, keep your eyes on the street.

Use your x100s a lot, that’s it!

Fuji X Custom Settings

Today arrived the new firmware for most of the Fuji X series cameras.  When you update all the custom settings are wiped out as well as cache memory and frame numberHere are more or less my latest  custom settings.

Name ISO Dynamic Range Film Simulation White Balance Colour Sharpness Highlight  Shadow  Noise 
Standard AUTO DR100 Provia (standard) Auto 0 0 0 0 0
Landscape Normal 200 DR100 Astia (soft) Auto -1 +1 -1 -2 0
Landscape  High Contrast 400 DR200 Astia (soft) Auto -1 +1 -1 -2 0
Portrait Neutral 200 DR100 Pro-Neg Standard Auto 0 0 0 0 0
Portrait Neutral Higher Contrast 400 DR200 Pro-Neg High Auto 0 +1 -1 -2 0
B&W Landscape 800 DR100 Mono+Red Auto 0 +1 0 0 0
B&W Portrait 800 DR100 Mono+Green Auto 0 +1 -1 -1 0


I have set them according to the subjects I tend to shot so I can change a whole group of settings with a push of the "Q" menu button and a quick turn of the dial.   Finer tweaks to color and highlight/shadow tone were done from experience of using the camera and the above are what I  eventually arrived at after some months of use.

I tend to play quite a bit with Highlight Tome, Sharpness and Shadow Tone so I change them often. For the ISO thee are times when I like to have in AUTO with Standard 200, Max 3200 and min shutter speed at Focal length I am using x1.8

While I like the more saturated colors and higher contrast in Astia (soft) for landscape generally, I found it tended to clip into the shadows too easily so I somewhat reduced the contrast there by making a -2 adjustment.

For portraits the Provia (standard) or Pro-Neg film simulations work well as they are rather neutral and subdued in colour, so render skin tones well.  The Pro-Neg Hi gives the same colours but more contrast.  I reduced the contrast at the shadow end as I found it was clipping to black too readily.

The dynamic range settings work really well and allow the camera to record more detail in highlights and shadows than in a normal exposure.  For the higher DR setting (DR200 is all I have needed) the camera needs to be set to ISO 400 but the sensor/processor is so effective that there is no discernible noise penalty.  It isn't an HDR feature....my understanding is that it works like many other similar features and the camera basically underexposes the image then processes in an exposure and tone curve that avoids clipping at each end.

The Jpeg output is so good on this camera that I shoot Jpeg almost all the time, whereas I only shoot RAW on my Nikon DSLRs.  Images from the X-E1 print superbly and have amazing pixel level sharpness.  The camera seems to resolve beyond what its 16MP sensor should, probably due to the absence of the anti aliasing filter.  Strangely, when 100% images are viewed on a computer monitor, detail can look somewhat mushy due to the unusual colour filter layout of the X-Trans sensor, but images view nicely at normal sizes and print in a very natural way, giving what I would describe as an organic look to textures that look real enough to touch and bitingly sharp.


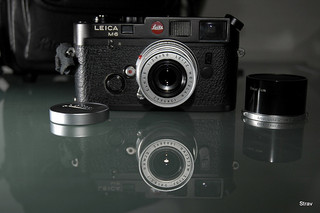
Leica M6

The Leica M6 is a rangefinder camera manufactured byLeica from 1984 to 1998.

Leica M6 Wetzlar, Elmar 50, ITOOY

The M6 combines the silhouette of the Leica M3 with a modern, off-the-shutter light meter with no moving parts and LED arrows in the viewfinder. Informally referred to as the M6 "Classic" to distinguish it from the "M6 TTL" models, and to indicate its "Classic" M3 dimensions. The top and bottom plates were made from lighter, cheaper magnesium alloy rather than the heavier machined brass of the M3. The M6 and M6 TTL are mechanical cameras; all functions save the light meter work without batteries, unlike the succeeding M7, which needs electrical power to operate properly.


My Recommended Menu Settings Fuji X pro 1

My Recommended Menu Settings

These are the camera settings I changed to made the Fuji X-Pro1 most suitable for my shooting needs. Your mileage may vary, but I found these tweaks to make the camera all the more usable than the stock camera settings:

Shooting Menu 1: Image Quality (RAW+FINE) – Always shoot in RAW. With RAW + FINE, you get the flexibility of RAW with the instant use of the X-Pro1?s excellent JPGs. Also a smart move until Adobe fixes issues with their demosaicing algorithm for the X-Pro1.

Shooting Menu 3: Fn Button (ISO) – Quick access to change the ISO from the Fn button. With this access, which I find faster than the Q button for dedicated ISO adjustment, you have all exposure settings at your fingertips.

Shooting Menu 4: AE/AF-Lock Mode (Switch) – Ability to switch AE-AF-Lock on by pressing button once instead of having to press and hold – a useful tweak if you focus and recompose often instead of changing the AF point.

Shooting Menu 4: AE/AF-Lock Button (AE+AF) – Locks both AE and AF.

Setup 1: Silent Mode (ON) – No AF confirmation noise or beeps from menu selections for quieter operation.

Setup 2: Quick Start Mode (ON) – Doesn’t completely power off camera to increase responsiveness.

Setup 2: Image Display (OFF) – Turns off default 1.5 second image review in EVF for smoother shooting experience. 

Setup 3: Color Space (sRGB) – My preferred color space.

“AF-ON” Button

With my DSLRs, I often have my cameras set up so that the shutter release only fires the shutter, while AF is controlled by the AF-ON button only. This way it’s so much faster shoot for my style of photography, and many other shooters prefer this set up as well.

While the Fuji X-Pro1 doesn’t really have a dedicated AF-ON button like most DSLRs, there is a work-around that you can use to achieve the exact same set up.

The small trick is to shoot in manual focus mode. The camera now defaults to allow the AE-L/AF-L button to activate focus as a kind of “AF override.” Now, the shutter release is entirely de-coupled from AF, but you can still activate AF through the AE-L/AF-L button, so in effect you’ve got your AF-ON button back.

AF Trick: Focus & Fire In One Action

One trick that many users seem to be finding out is to press the shutter release down fully to achieve focus and release the shutter in a single act. Most DSLR users are used to acquiring focus with a half-press and then firing the shutter after focus is locked. With the Fuji X-Pro1, the focusing lag experienced is partially due to the separation of these steps.

Many users are finding that by fully pressing the shutter release in one motion, the delay involving the contrast detection AF and shutter release seems to be lessened.

This trick is basically the opposite of the preceding trick to completely separate focus and shutter release, but if you’re a DSLR user who has been frustrated by the focus speed, it’s worth breaking your habits to see if this works for you. While this trick doesn’t work for all types of shooting, try it – you might just like it.

Never Shoot in 6FPS Bust Mode. Ever.

6FPS sounds great, until you realize that shooting in bursts will lock up your camera for what feels like 10x the time it took you to shoot your sequence. Just stick to single shot mode, your patience will thank you for it.


My Fuji Travel Kit

Over the last few weeks I have received a number of emails asking which camera bag I use with the Fujifilm X-Pro1 and also what equipment I include in my travel photography kit bag. I thought I would create a simple list of what I include in my travel photography kit regardless of the size of the trip. (Marco Secchi)


Cameras

Obviously I travel with the Fujifilm X-Pro1 camera and I carry with me the Fujinon 35mm and Fujinon 18mm lenses. In addition I also bring along the trusty Fujifilm X100. Occasionally I have the X10 in my pockets as well

The X100 is slightly smaller so tends to be carried around literally everywhere and it is perfect for those times when you are not photography focused but want quality photos if the opportunity arises.

I use one of my own brand  strap and Italian leather half case on the X-Pro1 to protect my camera

On the X100 I use again one of my own straps. They can be on the right or left side of the camera depending on your preference. A  leather ring  reduce the strap opening. The strap comes with a 1/2? split ring to attach to the camera.

Camera Bag

I use either the Think Tank Retrospective 5 Pinestone Shoulder Bag  or one of my own leather bags. Both bags come  with 3 divided sections ideal for the X-Pro1, X100 and a 2nd lens.

There are a number of additional pockets for ipad, documents memory cards etc

Tripod

For traveling light I always take my brilliant little GorillaPod

Accessories

I do not carry many carry accessories with me. Just a  lens cleaning cloth  a Hamma cable release for long exposures over 30 seconds, couple of spare batteries, connections to my ipad, iphone

I also pack a couple of soft release buttons, many argue these are vanity decoration but I do think they make the button easier to use. I use mine either in glass or  wood

I carry most of the time  the Fuji flash EF x20.


Nikon F3

 Nikon F3 – Still a Viable Shooter?Launched in 1980, the Nikon F3 replaced the F2 as their top of the line professional camera body, and went from being the most controversial to one of the best selling film cameras in the history of the company.

Nikon F3

Prior to the introduction of the F3, the Nikon pro bodies had always been fully mechanical, with no reliance on batteries except to power the meter (if you had one of

the metering heads). The F3, however, used a brand new electronically controlled horizontal-traveling titanium shutter which, in contrast to previous models, required battery power to operate.

This initially caused great consternation in the pro community, and the reluctance of many to switch to the new F3 was a real problem for Nikon. Many press photographers were unwilling to give up the reliability of their mechanical F2s for this new, untested electronic camera.

There are plenty of excellent websites that document the various features of the F3 so I won’t duplicate any of that here. What we’re interested in is basically this: is the Nikon F3 still a viable shooter today? The answer is an unreserved ‘Yes!’. A good clean body will set you back around the $200 mark, which is an amazing bargain for a camera this good, and you can use almost the entire range of Nikon manual focus lenses which can be picked up for equally good prices if you shop around a little.

The metering is very accurate, and for most situations I just leave the camera in auto mode and it very rarely gives me a bad exposure, even when shooting transparency film. The viewfinder is fantastic, one of the best I’ve used in a 35mm film camera, offering a full 100% view of the image area. If you are used to the cramped, squinty viewfinders of some consumer or ‘prosumer’ DSLRs, the F3s finder will be a revelation!

While we are on the subject, my 1986 F3 is the ‘HP’ variant, which means it has the high eye-point finder (DE3), with greater eye relief and a little less magnification. This finder is physically a little taller than the original (DE2) prism, but allows you to see the entire viewfinder image with your eye a little further from the eyepiece, which is particularly useful if you wear glasses. Even if you don’t, it’s still an excellent all-round finder and, although some users prefer the original, the F3HP variant would still be my recommendation.

A quick word about the motor drive for the F3. Known as the MD4, it’s capable of a blistering six frames per second, has power rewind and also powers the camera body when attached. What’s more, the camera and motor drive combo handles beautifully; for me it handles better than just the body alone. These can be had a very little money  and make using the F3 a total blast! Oh yeah, they sound cool too!

Go get you one, and shoot some film!